Nature has always been a source of inspiration for artists, captivating them with its intricate beauty and awe-inspiring forms. One artist who has masterfully captured the essence of nature in her artwork is Helen Ahpornsiri. Through her exquisite dried botanic illustrations, Ahpornsiri offers viewers a glimpse into the delicate details and remarkable diversity of the universe we live in.
Dried Botanics Pressed Into Delicate Fauna Compositions by Helen Ahpornsiri
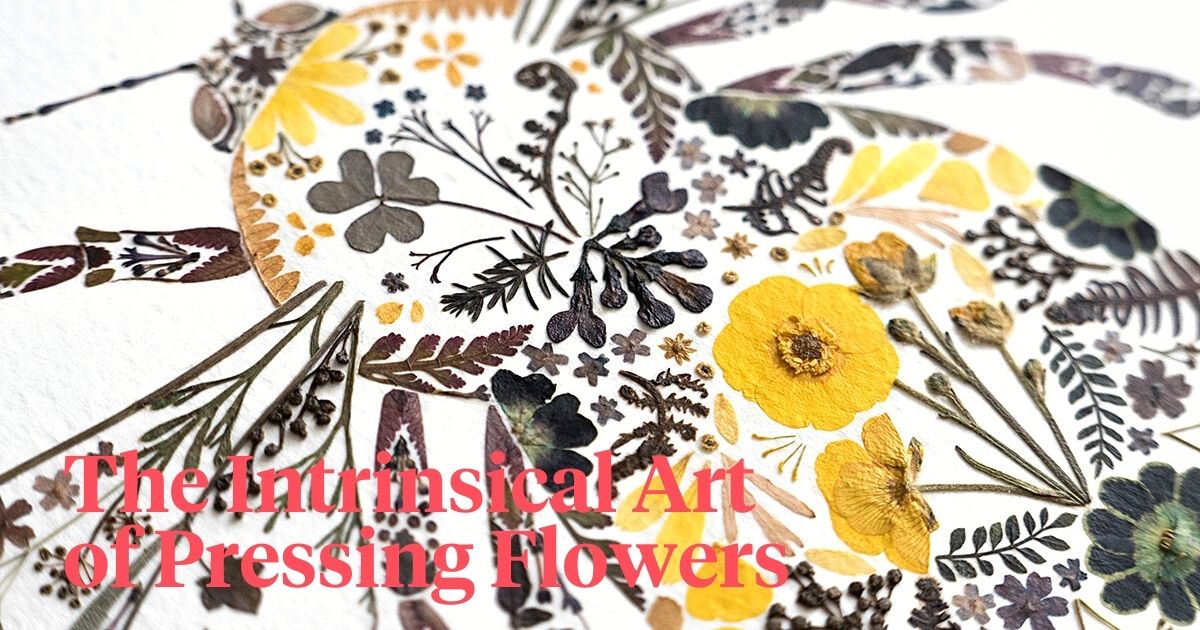
Artist Helen Ahpornsiri, based in England, creates captivating artworks by delicately pressing flowers and plants, revealing how unique nature is, but most importantly why we should start valuing more the flora and fauna that surrounds us. Ahpornsiri gathers botanical specimens from her own garden, carefully arranging the dried materials together like assembling a puzzle.

She particularly favors ferns and common wildflowers, finding inspiration in giving these unassuming or often disregarded plants a new narrative. Additionally, she incorporates marine algae into her pieces, foraged from the beaches along the south coast of England. Helen searches for loose pieces of marine algae along the shoreline and in rockpools, ensuring she does not disrupt the surrounding ecosystem, especially after turbulent seas.

An Artistic Collection Worth Checking Out
Within the artist's collection, an array of mammals and insects from various corners of the animal kingdom is showcased. These include creatures such as peacocks, bees, and elephants, meticulously crafted and enhanced by tiny fragments of gold leaf. The inclusion of these shimmering accents adds a touch of sparkle and vitality to the species Ahpornsiri brings to life.
Upon closer examination, the colors of the flowers within the artworks may appear faded, reminiscent of the way watercolors dry and softly bleed into their canvas. A notable example from her recent creations presents a comet moth delicately positioned on a blackboard. The moth's antenna is skillfully fashioned from a minute leaf, illustrating the delicate and intricate nature of the insect's anatomy.

The Inception of Her Creative Adventure
Helen Ahpornsiri's artistic journey began with a childhood fascination for collecting leaves and flowers. As she grew older, her love for nature and art merged seamlessly, leading her to pursue a degree in Illustration at the University of the West of England. It was during her studies that she discovered her unique artistic style: creating intricate illustrations using real plant materials.

Her technique involves carefully arranging and layering pressed botanical specimens to form intricate illustrations. Each piece is composed of countless plant fragments, meticulously arranged to depict various elements of nature, from animals and insects to plants and landscapes. The result is a harmonious blend of art and science, showcasing the beauty and complexity of the natural world.
What sets Ahpornsiri's work apart is her incredible attention to detail. Each botanical element is carefully chosen and delicately arranged, resulting in compositions that are both scientifically accurate and visually stunning. The textures and colors of the plant materials add an organic and tactile quality to her illustrations, inviting viewers to immerse themselves in the beauty of nature.
A Deep Subconscious Message Through Her Pieces
Beyond their aesthetic appeal, Helen Ahpornsiri's illustrations also carry a deeper message about the fragility of the world and the importance of conservation. By utilizing real plant materials, she highlights the interconnectedness of all living things and raises awareness about the need to protect our environment. Her work serves as a visual reminder of the incredible biodiversity that exists and the responsibility we have to preserve it for future generations.
Helen Ahpornsiri's art has gained recognition and acclaim worldwide. Her illustrations have been featured in numerous exhibitions, publications, and collaborations, captivating audiences with their unique blend of artistry and botanical precision. In addition to her artwork, the artist also conducts workshops and shares her knowledge with aspiring artists, inspiring them to explore the natural world through their own creative endeavors.
"I work with a variety of flora, preferring fern and wildflower species. Flowers commonly considered weeds are unassuming yet familiar, they can be embued in folk tales and personal connotations which resonate with people in different ways. I’m interested in the idea of preserving plants like these and giving them a new narrative."
How to Press Flowers With Helen Ahpornsiri
Flower Pressing is a great activity for both children and adults. It is a wonderful way to discover, appreciate, and build a connection with, the natural world. Presses can often be found in second-hand stores or made using wood, bolts, and wingnuts/straps. Even an old book can be used as a flower press. Below are some step-by-step instructions. Happy pressing!
Step 1 - Picking Your Flowers
Most plants that are quite flat will press nicely. There is a lot of trial & error in flower pressing, try the different flowers and leaves around you and see what works. Some of my favorite plants to press are ferns, forget-me-nots, queen anne’s lace, and violas. Excess moisture on your flowers should be avoided so try not to pick on rainy days or dewy mornings. If picking from a garden, only pick a few flowers at a time, as it’s best to keep them as fresh as possible before pressing.
Step 2 - The First Layer
For the first layer in your flower press place a sheet of corrugated cardboard and one or two pieces of blotting paper (other papers will work - I often use sheets of cartridge paper from old sketches, but blotting paper helps remove more moisture). Position your fresh flowers on top of the paper, thicker plants can sometimes be cut in half to make pressing easier. If using a book, place your blotting paper and flowers between the pages leaving a pinch of pages between each layer.
Step 3 - Filling Your Flower Press
Now cover your layer of flowers with another sheet of paper and more corrugated cardboard. Repeat this layering (Cardboard/paper/flowers/paper/cardboard) until you’ve placed all of the flowers you want to press. Place the top on your flower press and tighten the bolts/straps to medium/high pressure. If using a book, carefully place heavy books on top of your flower-filled book.


Step 4 - Storing the Flower Press
Keep your flower press in a warm dry place, like an airing cupboard. Warm air passing through the gaps in the corrugated cardboard will help dry out your plants quickly, which keeps the color bright.
Step 5 - Checking on Your Pressings
After a few days check on your flowers, some of the paper may need replacing if it feels cold or damp. If the paper feels dry leave your pressings as they are and close the flower press.


Step 6 - Opening the Flower Press
Most plants will be ready to remove from the press in around three weeks. It can take a little more or less time depending on the thickness and moisture content of the plants. Folded paper or envelopes are handy places to store your finished pressings. There are all kinds of crafts you can now do with your pressed flowers, if using them to make pictures most craft glues will work well, just make sure they are acid-free.

In a world where we often find ourselves disconnected from nature, these botanic illustrations serve as a gentle reminder of the beauty that surrounds us. Her beautiful compositions encourage us to pause, observe, and appreciate the wonders that the everyday world provides us with. Discover more of her art on Helena Ahpornsini's Instagram.
Photos by Helena Ahpornsini.